22 Dark Witchy Manicure Ideas for 2026:
By  Tasleem akhtar
• Published August 18, 2026
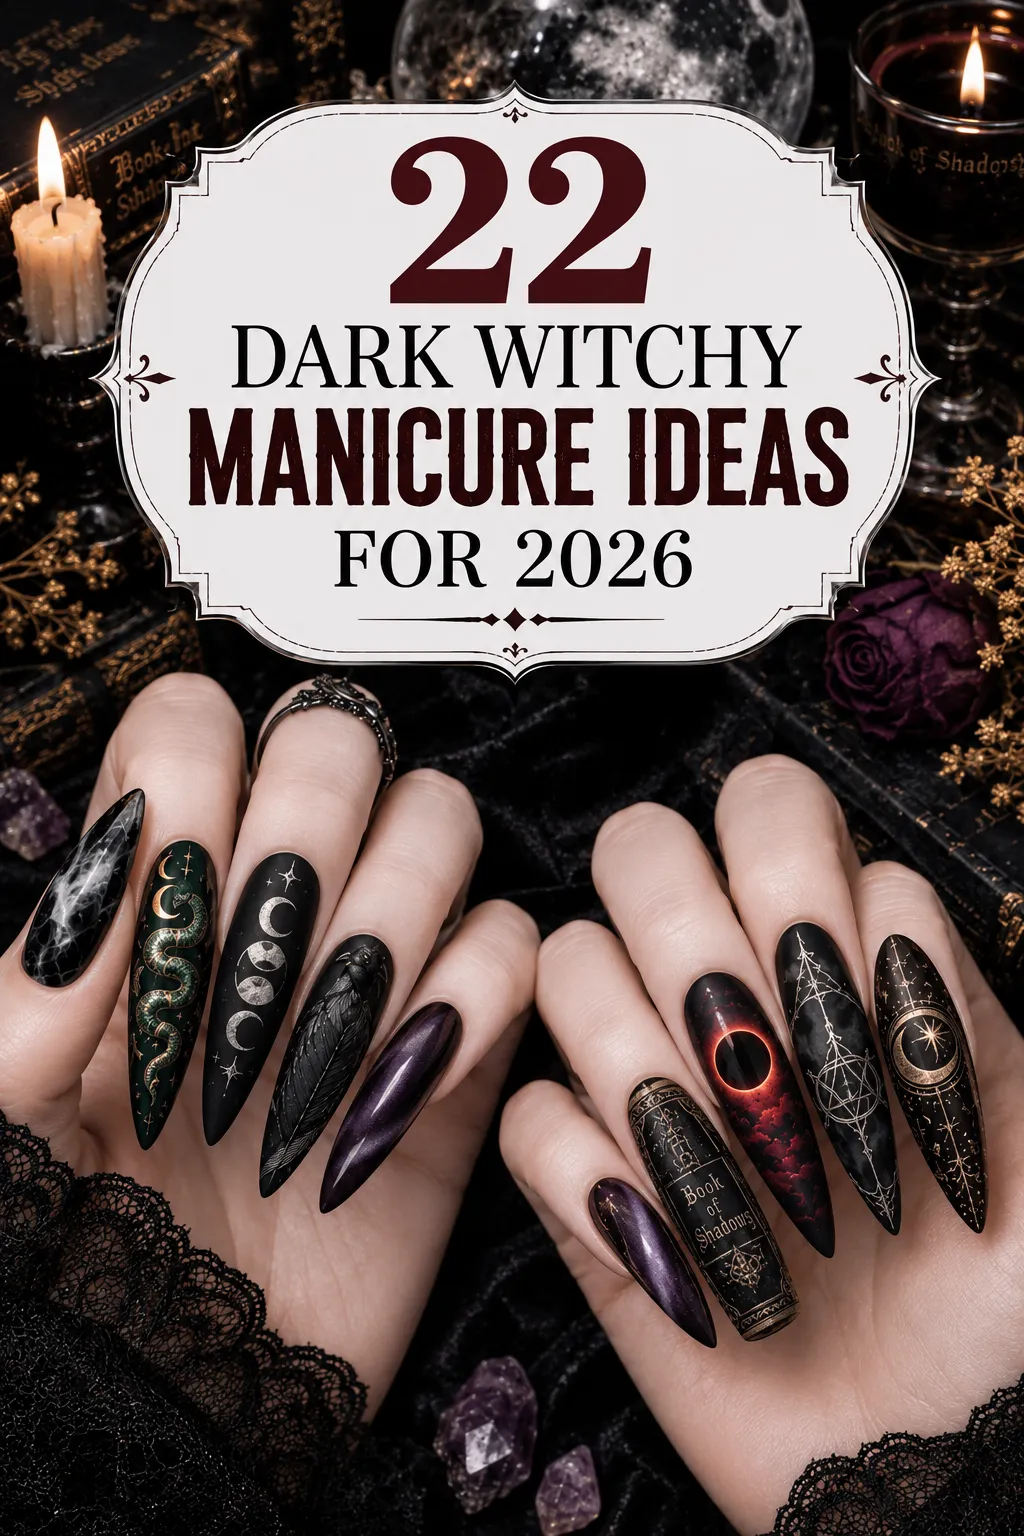
There’s a version of witchy nails that feels like a Halloween costume, and then there’s the version that looks like it belongs to a woman who quietly runs three businesses and owns an excellent coat. These 22 dark witchy manicure ideas are firmly in the second category.
Think cauldrons, crescent moons, spellbooks, potion bottles, ravens, runes, and celestial details, but reimagined in the sophisticated color palettes dominating Pinterest in 2026. Think oxblood instead of bright red, moss green instead of neon, warm parchment instead of stark white, and espresso instead of ordinary brown.
Whether you want something subtly mysterious or full-on gothic, there’s a design here worth saving. Pick one—or work your way through the entire grimoire.
Quick Takeaways
- Shape: Almond is leading the trend in 2026, while soft coffin works beautifully for extra length and short squoval suits cottagecore and dark-academia styles.
- Colors: Oxblood, espresso, moss green, ink navy, dusty mauve, aged parchment, deep plum, and classic matte black.
- Finishes: Matte remains the foundation, while chrome, cat-eye magnetic, velvet, satin, and textured finishes add dimension.
- Accents: Crescent moons, stars, sigils, botanical details, gold foil, pearls, snakes, tarot symbols, and vintage-inspired artwork.
- Overall vibe: Moody, folkloric, mysterious, and sophisticated enough to wear beyond Halloween.
1. Matte Onyx Witchy Black Nails with Smoke Marble Accent

If you want the classic witchy black nail look without making it feel predictable, start with matte onyx. Four nails stay completely matte while the ring finger features a smoky marble design that looks almost like swirling mist trapped beneath glass.
The contrast between the flat black finish and glossy marble accent gives this manicure a polished salon effect.
- Best for: Everyday wear, work, and anyone new to witchy nails.
- Nail shape: Almond.
- Length: Short to medium.
- Finish: Matte with one glossy marble accent.
- Skill level: Beginner.
- Tools/products: Black polish or gel, white and gray polish, dotting tool or toothpick, matte top coat, glossy top coat.
How to Create It
- Apply two thin coats of black polish and allow them to dry or cure completely.
- On the ring finger, add tiny drops of gray and white polish over the black.
- Drag a toothpick through the colors using slow, curved S-shaped movements.
- Apply matte top coat to the remaining nails and glossy top coat to the marble accent.
Drying/curing time: 2–3 minutes per regular polish coat or 30–60 seconds for gel.
Lasts: Around 7–10 days with regular polish and 2–3 weeks with gel.
Aftercare tip: Matte polish can quickly show body oils. Clean the surface gently with a lint-free pad and rubbing alcohol when needed.
Common mistake: Overworking the marble until the gray and white blend into one muddy shade.
2. Bubbling Cauldron Nail Art on Deep Teal
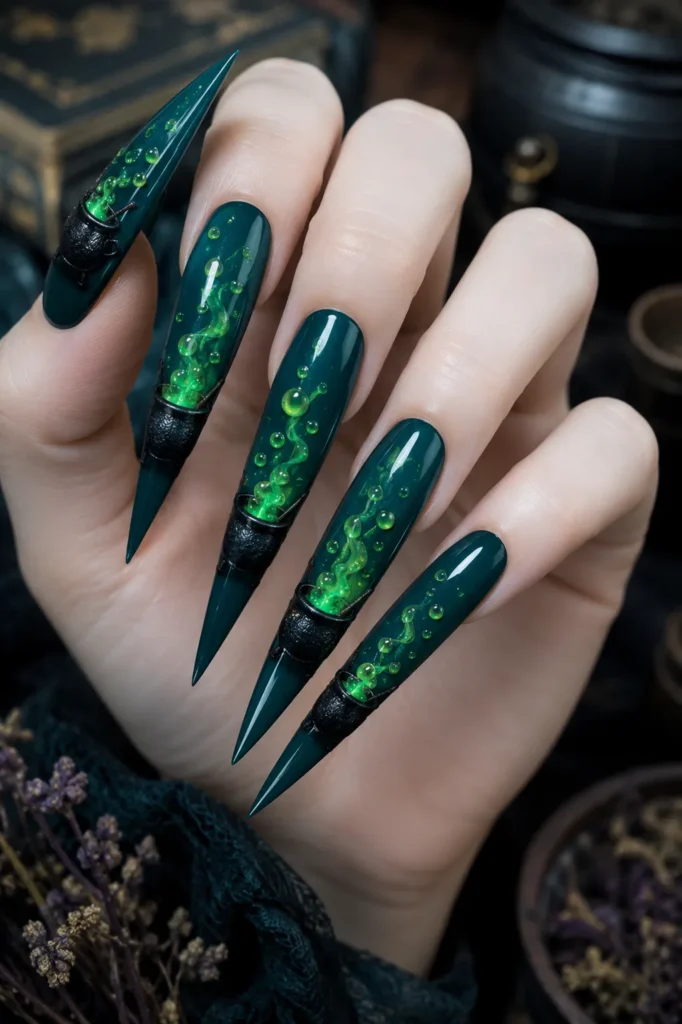
A witchy cauldron becomes surprisingly sophisticated when it is painted over deep teal instead of traditional black. The design needs only a rounded black pot, a little steam, and glowing green potion details to instantly create a storybook-witch aesthetic.
- Best for: Halloween parties, October content, and statement nails.
- Nail shape: Coffin or almond.
- Length: Medium.
- Finish: Glossy base with a matte cauldron.
- Skill level: Intermediate.
- Tools/products: Deep teal polish, black gel paint, acid-green gel paint, fine liner brush, matte and glossy top coats.
How to Create It
- Apply two coats of deep teal to the nails.
- On two accent nails, paint a wide black oval with a flat rim across the lower portion.
- Add acid-green color above the rim to represent the bubbling potion.
- Paint two or three tiny green bubbles rising from the cauldron.
- Sharpen the outline with a very thin black line before applying the top coat.
Drying/curing time: Approximately 30–60 seconds per gel layer.
Lasts: Around 2–3 weeks with gel.
Aftercare tip: Apply enough top coat to cover raised artwork and prevent the edges from lifting.
Common mistake: Making the cauldron too small or positioning it too high on the nail.
3. Gothic Witch Nails 2026: Oxblood Croc-Texture Tips
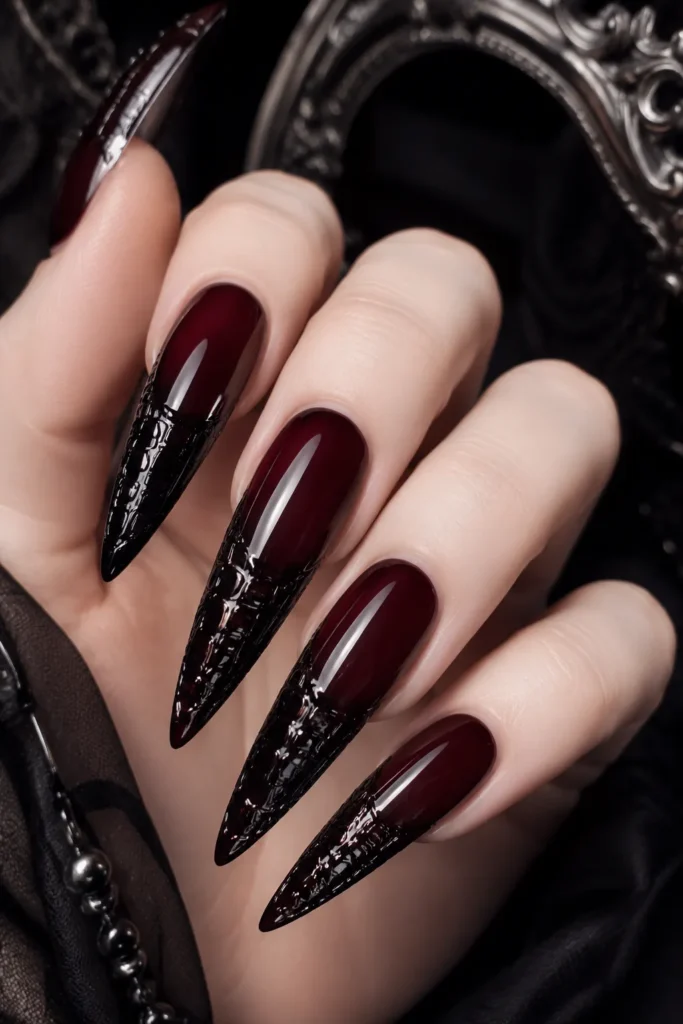
Crocodile-inspired texture meets gothic witch nails in this dramatic oxblood design. A sheer oxblood base is paired with raised, leathery-looking tips that catch the light beautifully.
It’s bold without relying on glitter.
- Best for: Evening events, autumn weddings, and textured manicure lovers.
- Nail shape: Long almond.
- Length: Long.
- Finish: Satin base with embossed matte tips.
- Skill level: Intermediate to professional.
- Tools/products: Sheer oxblood gel, black builder gel or 3D gel, croc-texture silicone mat, matte top coat.
How to Create It
- Apply two sheer oxblood coats and cure.
- Press thick black builder gel into a croc-texture silicone mat.
- Transfer the texture onto the nail tip and cure carefully.
- Trim excess texture from the free edge.
- Apply matte top coat over the appropriate sections.
Drying/curing time: Around 60 seconds per gel layer, with textured layers potentially requiring longer curing.
Lasts: Approximately 3 weeks.
Aftercare tip: Keep the textured edge filed because raised designs can catch on clothing.
Common mistake: Using thin regular gel instead of builder gel, causing the texture to flatten.
4. Pointed Witch Hat Nail Design on Milky Grey

For a witch hat design that feels wearable rather than cartoonish, use a soft milky-gray background and keep the hat slightly imperfect. A wide brim and subtly curved point make the artwork feel hand-painted and charming.
- Best for: Office-friendly Halloween looks, beginners, and short nails.
- Nail shape: Squoval or round.
- Length: Short.
- Finish: Glossy milky base with a matte hat.
- Skill level: Beginner.
- Tools/products: Milky-gray polish, black gel paint, fine liner brush, gold striping tape or gold pen, top coat.
How to Create It
- Apply two coats of milky gray.
- Paint a slightly curved black triangle on the ring finger.
- Add a wide horizontal brim.
- Place a thin gold band where the hat and brim meet.
- Matte the hat while leaving the background glossy.
Drying/curing time: 2–3 minutes per regular coat.
Lasts: Around 5–7 days with regular polish and approximately 2 weeks with gel.
Aftercare tip: Use a good base coat because pale shades can stain easily.
Common mistake: Making the brim too narrow, causing the design to resemble a simple cone.
5. Antique Spellbook Nail Art with Gilded Page Edges
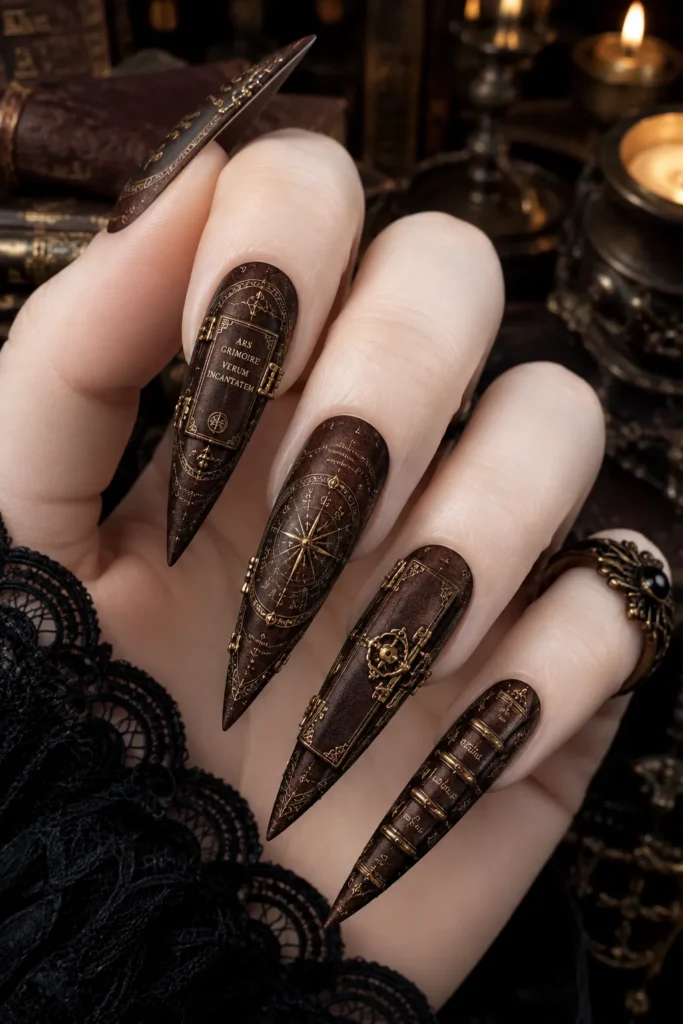
Forget the obvious spellbook cover. The real magic is in the pages. Cream-colored page edges, uneven lines, antique gold accents, and a rich leather-brown background create the impression of an ancient book.
- Best for: Dark academia, book lovers, autumn photoshoots.
- Nail shape: Almond.
- Length: Medium to long.
- Finish: Satin.
- Skill level: Intermediate.
- Tools/products: Leather-brown gel, cream gel paint, antique-gold foil or liner, black liner brush, satin top coat.
How to Create It
- Apply leather-brown polish to every nail.
- On two accent nails, paint a slightly tilted cream rectangle.
- Add uneven horizontal cream lines along the page edges.
- Highlight the edges with antique gold.
- Add a dark spine and tiny gold clasp detail.
Drying/curing time: About 60 seconds per gel layer.
Lasts: Around 2–3 weeks.
Aftercare tip: Excessive hand sanitizer can dull metallic accents, so avoid rubbing sanitizer directly over the artwork whenever possible.
Common mistake: Making every page line perfectly straight and evenly spaced.
6. Chrome Crescent Moon Nails on Ink Navy
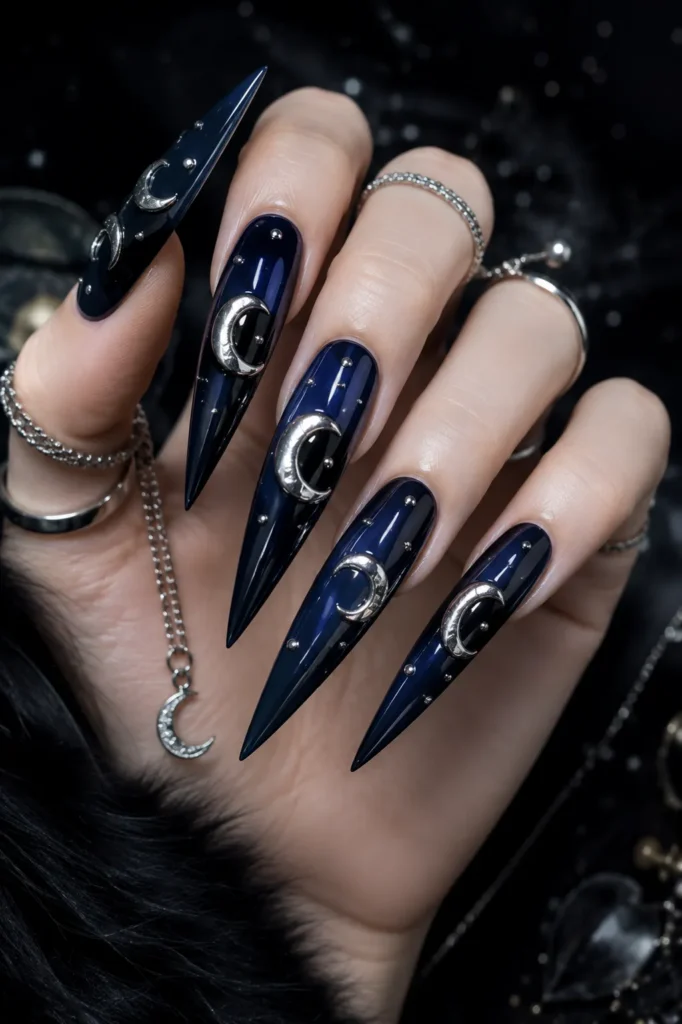
Crescent moon nails become much more modern when silver chrome replaces traditional gold. The combination of liquid-silver moons and nearly black navy creates a cold, mysterious finish that feels especially current for 2026.
- Best for: Minimalists, everyday wear, and mirror-finish lovers.
- Nail shape: Almond.
- Length: Short to medium.
- Finish: Glossy navy with chrome accents.
- Skill level: Intermediate.
- Tools/products: Ink-navy gel, silver chrome powder, no-wipe top coat, chrome applicator, fine brush.
How to Create It
- Apply two coats of ink navy and cure.
- Paint a thin crescent using no-wipe top coat.
- Cure the design according to the product instructions.
- Rub silver chrome powder over the crescent.
- Brush away excess powder and seal with top coat.
Drying/curing time: Around 60 seconds per layer.
Lasts: Approximately 2–3 weeks.
Aftercare tip: Protect chrome from abrasive cleaning products and rough sponges.
Common mistake: Applying chrome over an unsuitable wipe-off top coat, which can leave the finish dull.
7. Dark Academia Witchy Nails in Espresso & Ivory Script
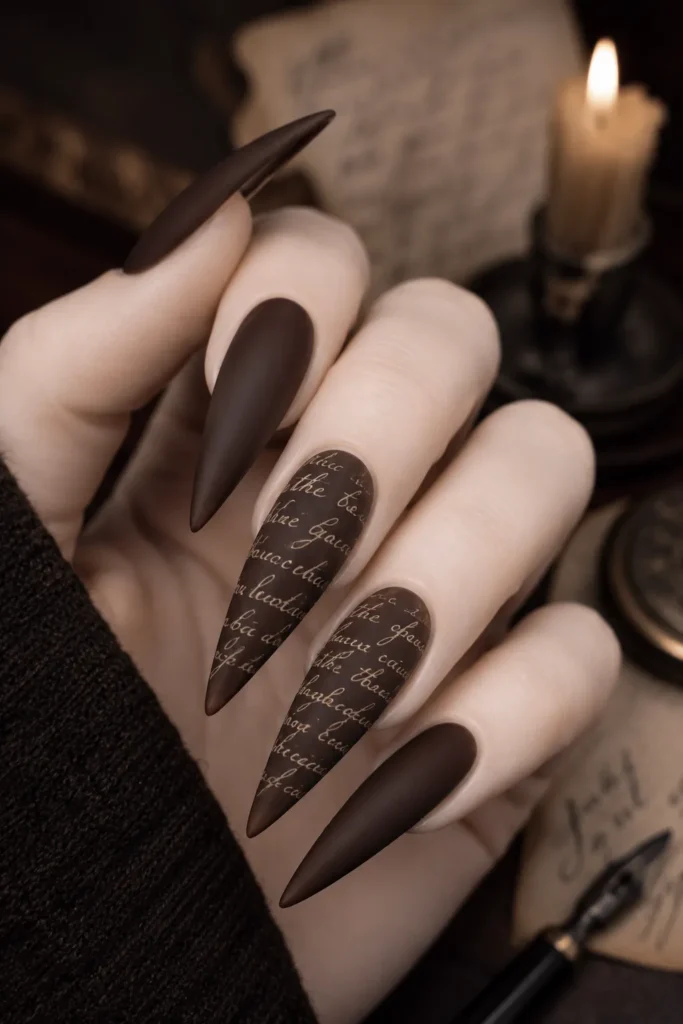
Dark academia and witchy nails naturally belong together. Instead of obvious symbols, this design uses loose ivory handwriting over rich espresso brown, giving the manicure the feeling of an old handwritten manuscript.
- Best for: Work, university, autumn outfits, and dark-academia fans.
- Nail shape: Short almond or squoval.
- Length: Short.
- Finish: Matte.
- Skill level: Intermediate.
- Tools/products: Espresso gel, ivory gel paint, ultra-fine liner brush, matte top coat.
How to Create It
- Paint all nails espresso brown.
- Add loose cursive lines to two or three nails.
- Keep the artwork concentrated around the center of the nail.
- Finish everything with matte top coat.
Drying/curing time: Approximately 60 seconds per gel layer.
Lasts: Around 2–3 weeks.
Aftercare tip: Use cuticle oil regularly because dry cuticles become more noticeable against dark polish.
Common mistake: Pressing too firmly with the liner brush and creating thick lettering.
8. Cottagecore Witch Nails with Pressed Wildflowers
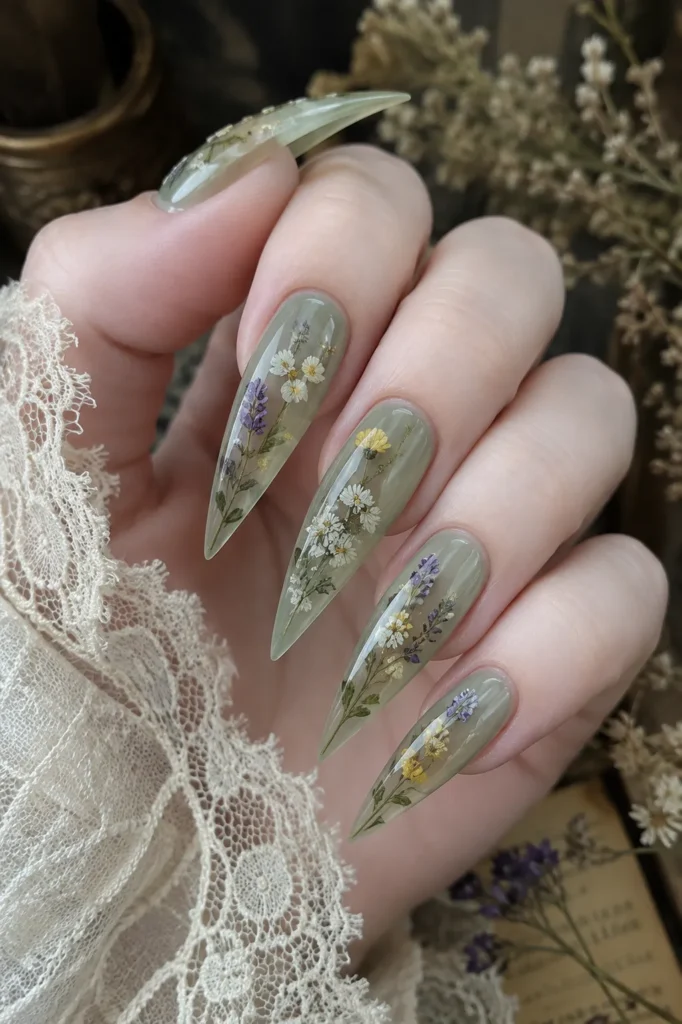
For a gentler interpretation of witchy nails, try tiny pressed flowers encapsulated beneath sheer sage polish. The slightly imperfect placement makes every nail feel handmade and organic.
- Best for: Spring, summer, weddings, and cottagecore aesthetics.
- Nail shape: Round or squoval.
- Length: Short.
- Finish: Glossy and encapsulated.
- Skill level: Intermediate.
- Tools/products: Sheer sage gel, tiny dried flowers, tweezers, clear builder gel, glossy top coat.
How to Create It
- Apply one sheer sage coat.
- Add a thin layer of clear builder gel.
- Position one or two tiny flowers with tweezers.
- Cure before adding another builder layer over the petals.
- File smooth and finish with glossy top coat.
Drying/curing time: Approximately 60–90 seconds per builder-gel layer.
Lasts: Around 3 weeks.
Aftercare tip: A UV-protective top coat can help reduce yellowing.
Common mistake: Using flowers that are too thick, creating bumps or trapped air.
9. Moss Green Witchy Nails with Copper Foil Veins

Deep moss green looks especially luxurious when paired with irregular copper foil. Instead of traditional floral designs, the metallic cracks resemble aged stone or weathered patina.
- Best for: Autumn, earth-witch aesthetics, and anyone bored with black.
- Nail shape: Almond or coffin.
- Length: Medium.
- Finish: Matte with metallic veins.
- Skill level: Beginner to intermediate.
- Tools/products: Moss-green gel, copper transfer foil, foil glue, fine brush, matte top coat.
How to Create It
- Apply two coats of moss green.
- Paint thin branching lines with foil glue.
- Allow the glue to become tacky.
- Press copper foil over the lines and peel it away.
- Seal with matte top coat.
Drying/curing time: Approximately 60 seconds per gel layer.
Lasts: Around 2–3 weeks.
Aftercare tip: Refresh the top coat after about 10 days to protect the foil.
Common mistake: Applying the foil before the glue becomes properly tacky.
10. Midnight Stars and Moon Nails with Micro-Pearls
Celestial witchy nails become even more interesting when tiny pearls are added to painted moons and stars. The combination of midnight blue, gold, and pearl details catches light beautifully in photographs.
- Best for: Parties, evening events, and celestial lovers.
- Nail shape: Almond.
- Length: Medium.
- Finish: Glossy with 3D accents.
- Skill level: Intermediate.
- Tools/products: Midnight blue-black gel, gold liner paint, tiny flat-back pearls, tweezers, gel glue, top coat.
How to Create It
- Paint the nails midnight blue-black.
- Add gold crescent moons and small four-point stars.
- Connect selected stars with ultra-fine lines.
- Attach three tiny pearls to accent nails using gel glue.
- Seal carefully around the pearls without covering their surface.
Drying/curing time: Approximately 60 seconds per layer.
Lasts: Around 2–3 weeks, although individual pearls may occasionally come loose.
Aftercare tip: Keep spare pearls and nail glue available for quick repairs.
Common mistake: Covering the pearls completely with top coat and losing their shine.
11. Apothecary Potion Bottle Nail Art on Sheer Nude

Potion bottles look most convincing when the background is nearly invisible. A sheer nude base allows tiny colorful bottles to appear as though they are floating on the nail.
- Best for: Workplace-friendly Halloween, art lovers, and subtle witchy styles.
- Nail shape: Almond or squoval.
- Length: Short to medium.
- Finish: Glossy sheer.
- Skill level: Intermediate to professional.
- Tools/products: Sheer nude gel, black liner paint, translucent purple and green gel, brown paint, fine brush, top coat.
How to Create It
- Apply one or two sheer nude coats.
- Outline tiny round and narrow potion bottles.
- Fill them with translucent purple or green.
- Leave a small highlight unpainted to create a glass effect.
- Add brown corks and tiny strings before sealing.
Drying/curing time: Approximately 60 seconds per layer.
Lasts: Around 2 weeks or longer depending on the base and application.
Aftercare tip: Sheer bases disguise regrowth better, making the manicure easier to wear for longer.
Common mistake: Using opaque colors inside the bottles and losing the translucent glass effect.
12. Witch Broom Nail Design with Straw Texture Detail
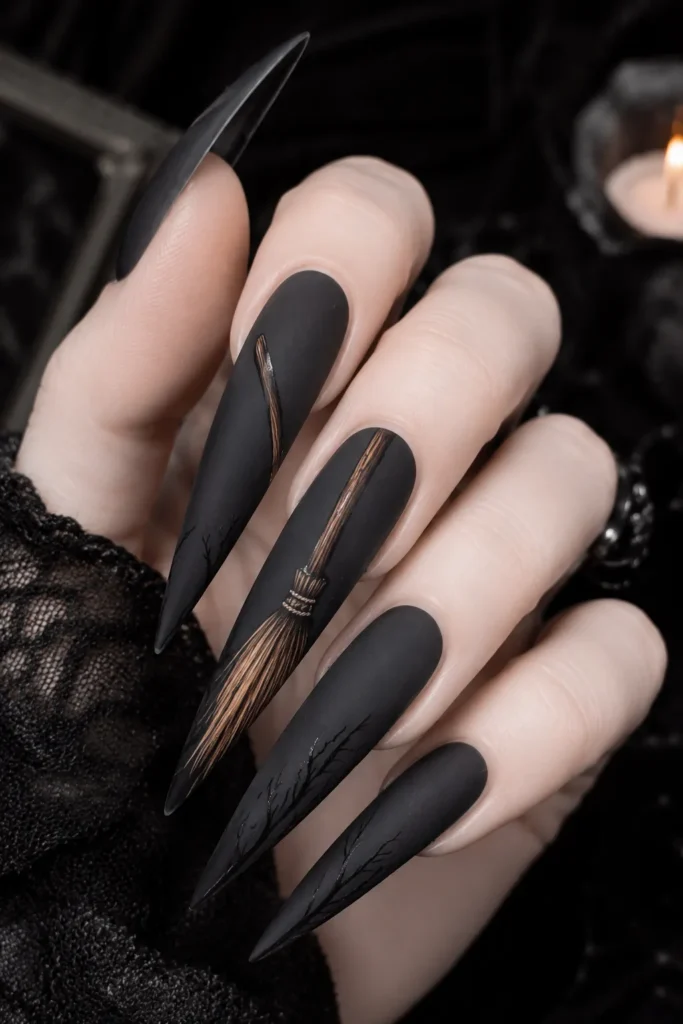
The secret to making witch broom nail art look convincing is the bristles. Instead of painting a solid triangle, create individual strokes with different lengths and slightly uneven angles.
- Best for: Halloween and storybook-inspired witch aesthetics.
- Nail shape: Coffin or almond.
- Length: Medium to long.
- Finish: Matte charcoal with glossy broom details.
- Skill level: Intermediate.
- Tools/products: Charcoal-gray gel, tan and brown gel paints, black liner, fine brush, matte top coat.
How to Create It
- Paint the nails charcoal gray.
- Draw a thin brown handle diagonally across one accent nail.
- Add 12–15 uneven tan strokes at the bottom.
- Add a black binding band around the bristles.
- Finish with matte top coat.
Drying/curing time: Approximately 60 seconds per layer.
Lasts: Around 2–3 weeks.
Aftercare tip: Matte charcoal disguises small chips surprisingly well.
Common mistake: Making every bristle identical, which makes the design resemble a paintbrush.
13. Velvet Plum Cat-Eye Witch Nails

If you want dramatic witchy nails without detailed artwork, magnetic plum cat-eye polish is one of the easiest options. The shifting band of light resembles polished gemstone or velvet.
- Best for: Date nights, events, and low-effort statement nails.
- Nail shape: Almond or coffin.
- Length: Medium.
- Finish: Velvet cat-eye.
- Skill level: Beginner.
- Tools/products: Black base gel, plum magnetic cat-eye gel, nail magnet, top coat.
How to Create It
- Apply and cure a black base.
- Apply plum magnetic gel.
- Hold the magnet close to the nail at an angle for several seconds.
- Cure immediately after achieving the desired magnetic effect.
- Add another layer if you want a stronger velvet band.
- Finish with top coat.
Drying/curing time: Approximately 60 seconds per layer.
Lasts: Around 3 weeks.
Aftercare tip: Regular cuticle oil is enough to maintain the overall look.
Common mistake: Curing the magnetic polish before positioning the magnet.
14. Charcoal Smoke Ombre with Silver Sigils

A charcoal-to-nude gradient gives witchy symbols a softer, more wearable appearance. Thin silver sigils over the darkest portion of the ombre add mystery without making the manicure overly busy.
- Best for: Everyday witchy styles and gradient lovers.
- Nail shape: Almond.
- Length: Medium.
- Finish: Matte.
- Skill level: Intermediate.
- Tools/products: Nude and charcoal gel, makeup sponge, silver liner paint, fine brush, matte top coat.
How to Create It
- Apply and cure the nude base.
- Dab charcoal polish onto a makeup sponge.
- Press it gradually onto the upper half of the nail.
- Build the gradient using several light applications.
- Add simple angular silver symbols.
- Finish with matte top coat.
Drying/curing time: Approximately 60 seconds per sponged layer.
Lasts: Around 2–3 weeks.
Aftercare tip: The soft gradient grows out naturally without looking harsh.
Common mistake: Applying too much charcoal at once and creating a hard line.
15. Black Lace Veil Nails over Blush Base

For a romantic gothic manicure, delicate black lace over warm blush is hard to beat. From a distance it looks feminine and elegant; closer inspection reveals the dark, witchy character.
- Best for: Weddings, dinners, romantic gothic outfits.
- Nail shape: Almond or oval.
- Length: Short to medium.
- Finish: Glossy.
- Skill level: Intermediate.
- Tools/products: Blush gel, black stamping polish, lace stamping plate, silicone stamper, scraper, top coat.
How to Create It
- Apply two coats of blush polish.
- Cover the lace stamping plate with black polish.
- Scrape away excess polish in one smooth motion.
- Pick up the design with the stamper.
- Roll it onto the nail rather than pressing straight down.
- Clean the sidewalls and apply top coat.
Drying/curing time: Approximately 60 seconds per gel layer.
Lasts: Around 2 weeks.
Aftercare tip: Use a generous top coat to protect stamped artwork.
Common mistake: Scraping at the wrong angle and removing polish from the etched design.
16. Burnt Amber Nails with Black Rune Stamping
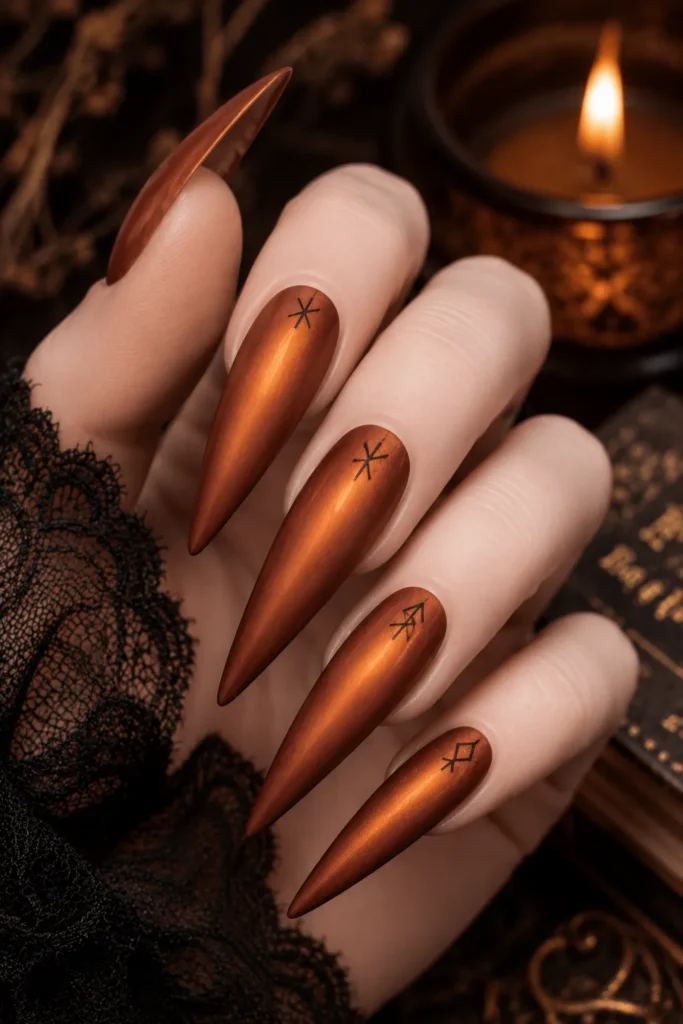
Burnt amber is one of those underrated colors that instantly feels autumnal and mysterious. Small black rune symbols placed near the cuticle keep the design subtle while adding a distinctly witchy detail.
- Best for: Autumn, warm skin tones, and everyday wear.
- Nail shape: Squoval.
- Length: Short.
- Finish: Satin.
- Skill level: Beginner to intermediate.
- Tools/products: Burnt amber gel, black stamping polish, rune stamping plate, stamper, satin top coat.
How to Create It
- Apply burnt amber across all nails.
- Stamp one small rune near the lower third of each nail.
- Use different symbols across the fingers.
- Seal everything with satin top coat.
Drying/curing time: Approximately 60 seconds per gel layer.
Lasts: Around 2–3 weeks.
Aftercare tip: Satin finishes offer a softer shine and can hide minor scratches.
Common mistake: Placing the symbols too close to the cuticle, which makes regrowth more noticeable.
17. Slate Grey Witch Nails with Raven Feather Art
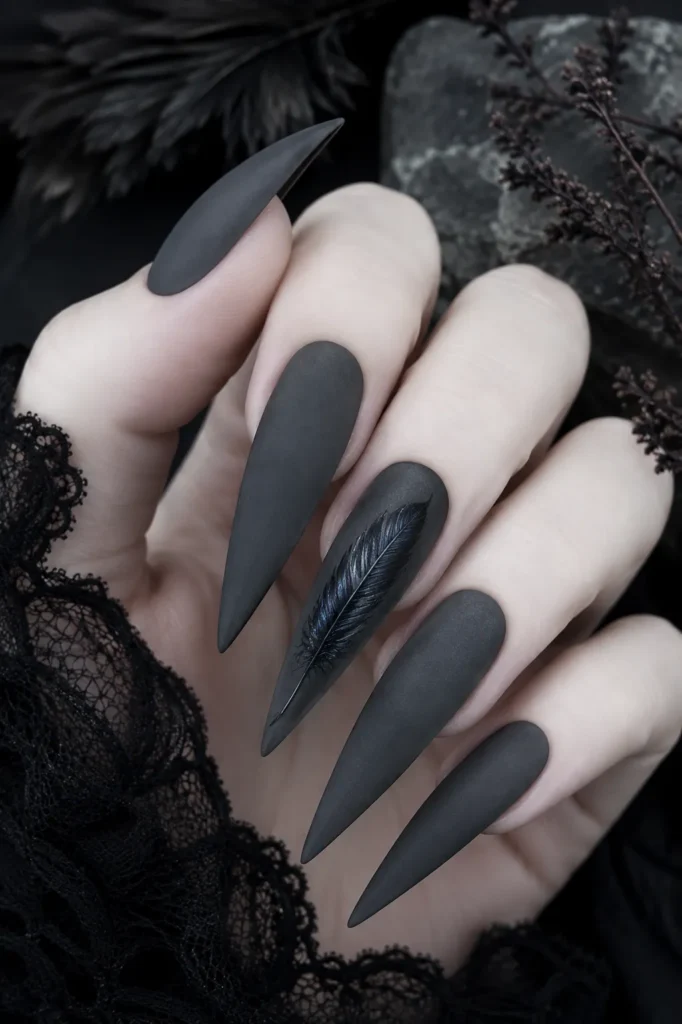
A single raven feather sweeping diagonally across slate gray creates a beautifully understated witchy manicure. The key is visible feather texture rather than a perfectly symmetrical silhouette.
- Best for: Minimalists, nature-witch aesthetics, and autumn.
- Nail shape: Long almond.
- Length: Long.
- Finish: Matte.
- Skill level: Intermediate to professional.
- Tools/products: Slate-gray gel, black and dark-blue gel paints, fine liner brush, matte top coat.
How to Create It
- Apply slate gray to all nails.
- On one accent nail, paint a curved black feather shaft.
- Add short strokes at varying lengths on either side.
- Add a few dark-blue strokes for subtle iridescence.
- Finish with matte top coat.
Drying/curing time: Approximately 60 seconds per layer.
Lasts: Around 2–3 weeks.
Aftercare tip: File long almond nails regularly to maintain the pointed silhouette.
Common mistake: Making every feather barb identical and perfectly symmetrical.
18. Iridescent Black Beetle-Shell Nails
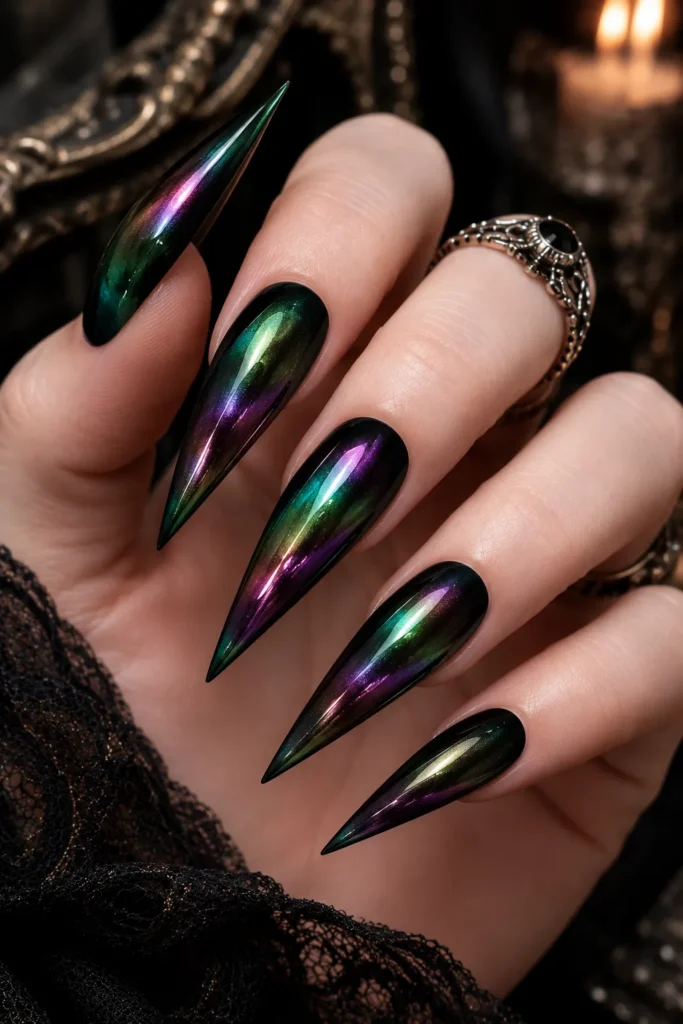
This design proves you don’t need nail art to achieve a witchy effect. A black base combined with oil-slick chrome shifts between green, purple, and bronze as the hands move.
Best for: Nightlife, statement manicures, and anyone who dislikes detailed nail art.
Nail shape: Any.
Length: Any.
Finish: Iridescent chrome.
Skill level: Beginner.
Tools/products: Black gel, aurora or oil-slick chrome powder, no-wipe top coat, applicator, final top coat.
How to Create It
Apply two coats of black gel.
Add and cure a no-wipe top coat.
Buff aurora chrome powder across the nail.
Continue until the surface becomes highly reflective.
Dust away excess and seal thoroughly.
Drying/curing time: Approximately 60 seconds per layer.
Lasts: Around 3 weeks.
Aftercare tip: Refresh the top coat around the middle of the wear period to preserve the color shift.
Common mistake: Using only one thin sealing layer, allowing the chrome to wear away at the edges.
This design proves you don’t need nail art to achieve a witchy effect. A black base combined with oil-slick chrome shifts between green, purple, and bronze as the hands move.
- Best for: Nightlife, statement manicures, and anyone who dislikes detailed nail art.
- Nail shape: Any.
- Length: Any.
- Finish: Iridescent chrome.
- Skill level: Beginner.
- Tools/products: Black gel, aurora or oil-slick chrome powder, no-wipe top coat, applicator, final top coat.
How to Create It
- Apply two coats of black gel.
- Add and cure a no-wipe top coat.
- Buff aurora chrome powder across the nail.
- Continue until the surface becomes highly reflective.
- Dust away excess and seal thoroughly.
Drying/curing time: Approximately 60 seconds per layer.
Lasts: Around 3 weeks.
Aftercare tip: Refresh the top coat around the middle of the wear period to preserve the color shift.
Common mistake: Using only one thin sealing layer, allowing the chrome to wear away at the edges.
19. Deep Emerald Witchy Nails with Snake Coil Gold
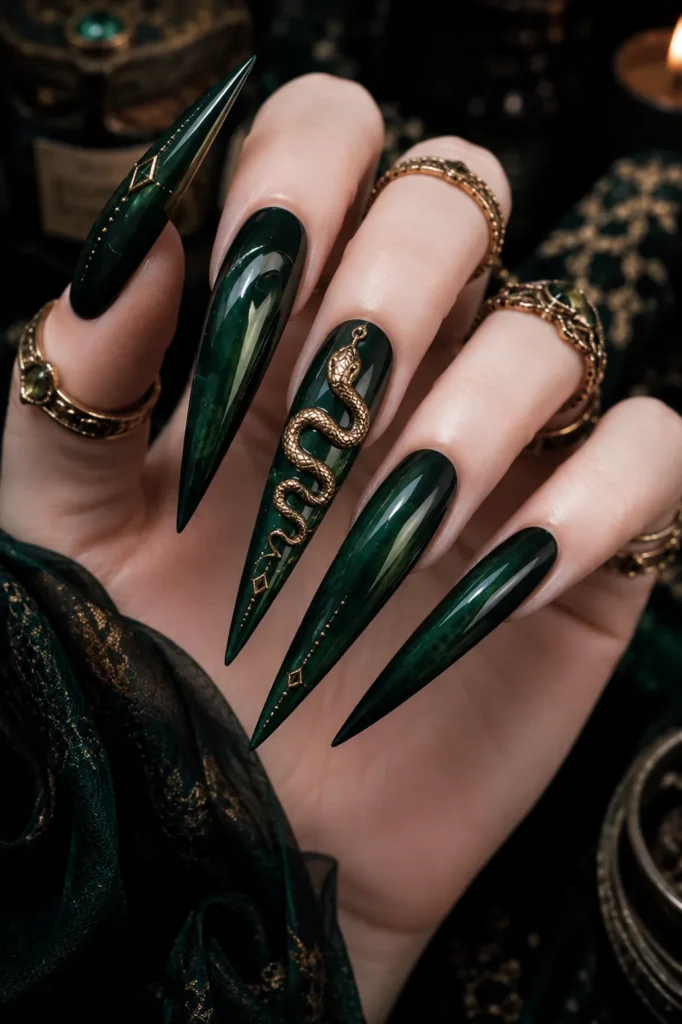
Deep emerald and a winding gold serpent create one of the boldest high-priestess-inspired looks in the collection. It is dramatic, luxurious, and especially striking on long nails.
- Best for: Special events, bold outfits, and long-nail lovers.
- Nail shape: Coffin or stiletto.
- Length: Long.
- Finish: Glossy.
- Skill level: Professional.
- Tools/products: Emerald gel, gold and black gel paints, fine liner brush, top coat.
How to Create It
- Apply two coats of emerald green.
- Paint a gold S-shaped serpent from the cuticle toward the tip.
- Make the body thicker in the center and tapered at both ends.
- Add tiny black scale marks.
- Finish with a small head and subtle eyes.
- Seal with glossy top coat.
Drying/curing time: Approximately 60 seconds per layer.
Lasts: Around 2–3 weeks.
Aftercare tip: Long coffin nails should be filed carefully to protect the sidewalls.
Common mistake: Making the serpent the same thickness from head to tail, which can make it resemble a random squiggle.
20. Dusty Mauve Almond Nails with Tarot Card Tips
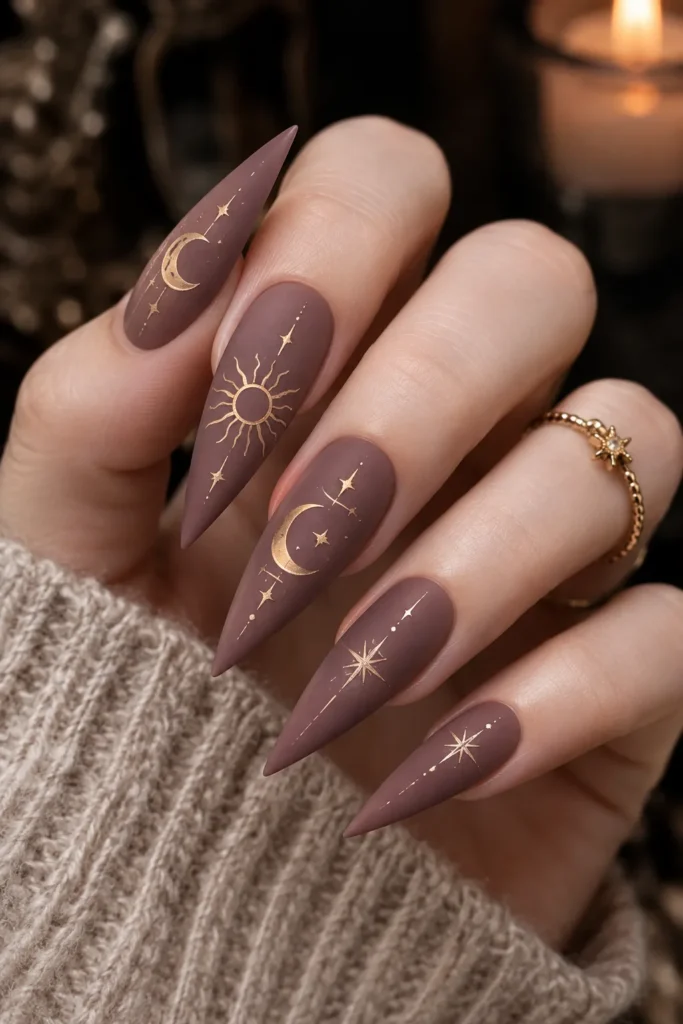
Tarot-inspired nails don’t have to be theatrical. Dusty mauve provides a soft background for tiny framed cards featuring simplified Moon, Star, and Sun symbols.
- Best for: Tarot lovers, autumn, and subtle statement manicures.
- Nail shape: Almond.
- Length: Medium.
- Finish: Matte with glossy card details.
- Skill level: Professional.
- Tools/products: Dusty-mauve gel, cream and navy gel paints, gold liner, fine brush, matte and glossy top coats.
How to Create It
- Paint the nails dusty mauve.
- Create small cream rectangles near the tips.
- Add delicate gold borders.
- Place one simple celestial symbol inside each card.
- Matte the mauve background and gloss only the miniature card faces.
Drying/curing time: Approximately 60 seconds per layer.
Lasts: Around 2 weeks.
Aftercare tip: Refresh the top coat around day seven because tip artwork experiences the most wear.
Common mistake: Adding too many details to each tiny tarot card.
21. Matte Black Stiletto with Blood-Moon Ombre Ring Finger
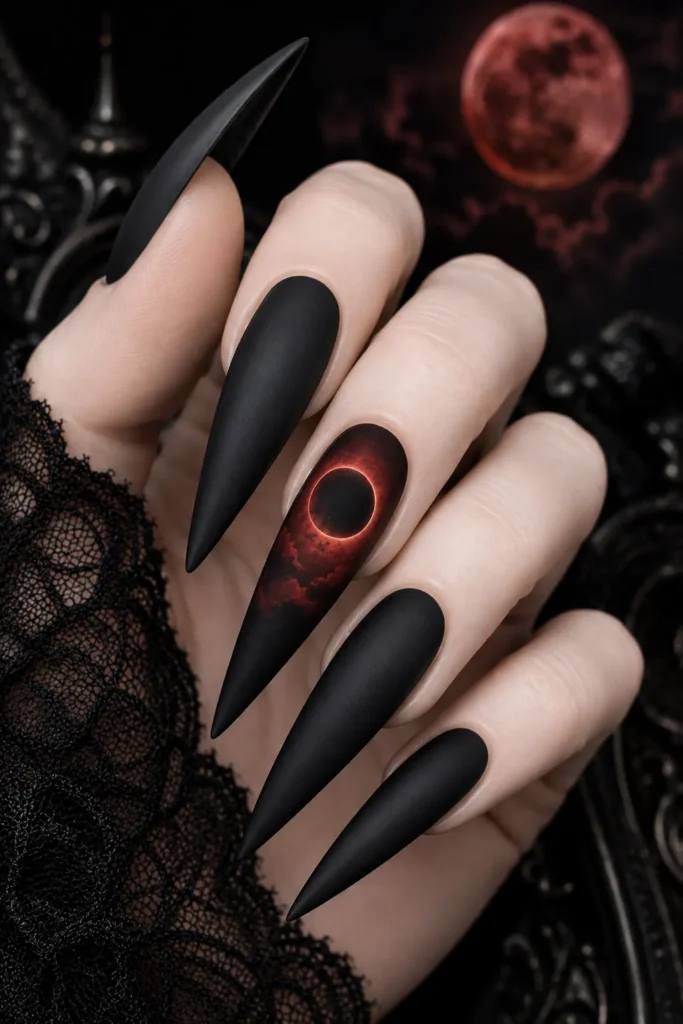
For maximum drama with surprisingly little effort, pair long matte-black stilettos with one blood-red eclipse-inspired accent nail. The single red feature keeps the design powerful without overwhelming the hand.
- Best for: Concerts, Halloween, dramatic looks, and statement nails.
- Nail shape: Stiletto.
- Length: Long.
- Finish: Matte.
- Skill level: Beginner to intermediate.
- Tools/products: Black gel, deep blood-red gel, makeup sponge, black liner, matte top coat.
How to Create It
- Paint every nail black except the ring finger.
- Sponge deep red into the center of the ring finger.
- Blend the edges into black.
- Paint a black circle over part of the red to create an eclipse effect.
- Finish all nails with matte top coat.
Drying/curing time: Approximately 60 seconds per layer.
Lasts: Around 2–3 weeks.
Aftercare tip: Long stiletto tips benefit from proper reinforcement to reduce breakage.
Common mistake: Applying too much red at once and creating a harsh edge instead of a soft ombre.
22. Aged Parchment Nails with Alchemy Symbols

For the quietest witchy manicure in the collection, try warm parchment nails with subtle tea-stained edges and tiny alchemy symbols. The result looks like a weathered page pulled from an ancient spellbook.
- Best for: Everyday wear, dark academia, subtle witchy styles, and short nails.
- Nail shape: Short squoval or round.
- Length: Short.
- Finish: Matte.
- Skill level: Intermediate.
- Tools/products: Warm off-white gel, sheer tan gel paint, dark-brown liner paint, sponge, fine brush, matte top coat.
How to Create It
- Apply warm off-white polish.
- Lightly dab sheer tan around the edges and in a few random areas.
- Add one small brown alchemy symbol to each nail.
- Finish with matte top coat for a paper-like appearance.
Drying/curing time: Approximately 60 seconds per layer.
Lasts: Around 2–3 weeks.
Aftercare tip: Pale shades can stain, so wear gloves when working with strong spices.
Common mistake: Applying too much tan and making the nails look dirty instead of naturally aged.
Conclusion
Dark witchy manicure ideas have officially grown up. The 2026 interpretation is less about bright Halloween orange and predictable black-and-orange combinations and more about sophisticated shades such as oxblood, moss, espresso, plum, navy, and aged parchment.
Whether you choose dramatic croc-textured tips, emerald snake artwork, velvet cat-eye polish, or a single tiny crescent moon, the secret is the same: let the color, texture, and finish create the mood instead of covering every nail with symbols.
The strongest looks usually follow a few simple rules:
- Matte and satin finishes often look more luxurious than high gloss.
- Muted shades such as moss, oxblood, espresso, and plum are easier to wear beyond Halloween.
- One or two detailed accent nails can make a stronger statement than ten crowded nails.
- Almond remains one of the most versatile shapes for witchy manicures.
- Short squoval nails are ideal for office-friendly and minimalist designs.
- Chrome, velvet cat-eye, foil, and textured finishes provide dimension without relying on glitter.
Grouped Picks
Best for Everyday
- Matte Onyx Witchy Black Nails with Smoke Marble Accent
- Aged Parchment Nails with Alchemy Symbols
- Burnt Amber Nails with Black Rune Stamping
Best for Parties
- Deep Emerald Witchy Nails with Snake Coil Gold
- Iridescent Black Beetle-Shell Nails
- Matte Black Stiletto with Blood-Moon Ombre
Best for Beginners
- Pointed Witch Hat Nail Design on Milky Grey
- Velvet Plum Cat-Eye Witch Nails
- Moss Green Witchy Nails with Copper Foil Veins
Frequently Asked Questions
1. What colors work best for a witchy manicure that isn’t just black?
Oxblood, moss green, espresso brown, ink navy, deep plum, dusty mauve, and aged parchment all create a witchy mood without depending on black. Deep, muted shades generally feel more sophisticated than bright colors.
2. Can I wear these dark witchy manicure ideas on short nails?
Absolutely. Short nails look especially good with simple focal details such as crescent moons, witch hats, rune stamps, tiny stars, and single celestial symbols. Short squoval and round shapes work particularly well.
3. How can I stop matte black nails from looking dusty?
Matte surfaces naturally show oils from your hands. When the finish begins looking uneven, gently clean the nail surface with a lint-free pad and rubbing alcohol. A fresh matte top coat can also restore the finish.
4. What is the easiest witchy nail design for beginners?
Magnetic plum cat-eye nails are one of the easiest options because the magnetic effect creates most of the visual interest. The milky-gray witch hat design is another beginner-friendly choice.
5. How can I draw thin nail-art lines without making them wobbly?
Use a quality liner brush, keep your gel paint thin enough to flow smoothly, and rest your painting hand on a stable surface. Instead of moving only the brush, rotate the nail as you paint whenever possible.
6. Will pressed flowers last on cottagecore witch nails?
Yes, when they are completely encapsulated under builder gel. Every edge of the flower should be covered so there are no exposed pieces that can lift.
7. Do I need gel polish for these designs?
Not always. Simple witch hats, moons, ombre effects, and basic symbols can be created with regular polish. Chrome, magnetic cat-eye, encapsulated flowers, and some textured designs work best with gel products and proper curing equipment.
8. How can I keep gold foil and chrome from losing their shine?
Seal them properly with compatible top coat and avoid unnecessary abrasion. Applying two thin protective layers can help preserve metallic details, while minimizing direct contact with harsh cleaning products can extend the finish.
Tasleem akhtar
- Fresh nail designs and ideas for every mood and occasion
- Seasonal trends from summer brights to festive nails
- And much more to keep your nails healthy and beautiful

The Conversation
Your voice matters. Discussions are moderated for civility.